• The HappySmileUK Superstore.

    • Store
  • Get directions
    Business hours
The HappySmileUK Superstore.
Categories

HOW TO GET STARTED! **(DENTAL PRODUCT INSTRUCTIONS)**

Store/HOW TO GET STARTED! **(DENTAL PRODUCT INSTRUCTIONS)**


--------------------------------------------------
You must visit our new shop to order.
We supply the public & dentists.
>>Please visit our new dental shop to order click here.
----------------------------------------------------


Click Here For HappySmile Shop Home Page

Dental Product Instructions:

*******************************************************

Checkout our custom fit dental lab tray service. Simply order online!

Invest in our expert custom fit dental lab trays. Highest quality. Easy service. Get exceptional results with our custom fit dental lab trays.

We also supply our Custom Fit Dental Lab Tray Service- Simply Order Online- Click Here

*******************************************************

HappySmile (UK) Dental Product Instructions:

HappySmile. Professional Tooth Whitening Made Easy.

This page will give you all the information you need to whiten teeth the professional way. This is the complete guide to all that you need to know to get started. Simply follow all these easy to understand step-by-step instructions. If you need any further help or support then please contact our customer services.

1) Apply the dental gel into your trays. 2) Wear the gel for upto 30 mins for 14 days.

You MUST Keep All Dental Gels in the Fridge or Cool Place.

********************************

How the HappySmile Dental Procedure Works in (3) Easy Steps:

Once you have purchased the HappySmile or Polanight dental gel and purchased urther down this page for dental whitening gel and dental tray options.)

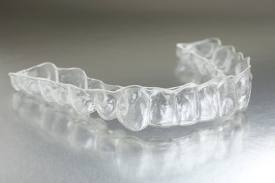
STEP 1. Apply an even dose of the whitening gel all around the inside of the dental tray. (The inside of the tray that will go onto your front of your teeth.)

STEP 2. Wear the dental tray for 30 mins per application unless of course you are using our HappySmile 35% (Ultra-High strength) formula and that will be reduced down to ONLY 10 mins. (This dental procedure is done for 10 to 14 days if it is for a new full course of treatment.)

STEP 3. When you have finished wearing your dental trays then simply take them out of your mouth and gently remove the gel from your teeth using a soft tooth brush with water. You also want to use the soft tooth brush to gently clean your dental trays to remove the gel under a cold water tap and then you simply dry off your trays with a clean tissue.

Please ensure you always use a soft toothbrush during the professional tooth whitening procedure.

After this tooth whitening procedure you must only drink water or milk and not to consume any food or smoke this is because the dental enamel is still open and would re-stain.

Simply wait (2) hours and then you can carry on as normal.

When you follow these (3) easy steps you will soon restore your teeth back to your natural whiteness!

How to make your trays in 2 easy steps.

STEP 1. Select the Gel Strength. (See below for different options)

STEP 2. Select a tray system if you are new to professional tooth whitening. (See below for different options)

10% carbamide peroxide or 16% carbamide peroxide strength as these strengths are ideal starter gels. HappySmile 35% ULTRA-HIGH strength is our best selling dental item as it offers very fast results.

Select Your Dental Gel Strength:

Please note: All the HappySmile brand gel strengths are very gentle even when you use the ultra-high formula. We supply the main two popular tooth whitening systems HappySmile. Ordering online is very easy, simply click & buy your dental gel and dental tray system online and we will deliver you these dental patient whitening products to your door using Royal Mail

********************************************************************************************

Select Your Dental Whitening Gel Pack Below:

Available in HappySmile or SDI Polanight Brands.

(10) syringes are needed for a full course of home whitening treatment.

**************************************************************************************

Dental Gel 10% Options 1.

10% is ideal for those who might have sensitivity. HappySmile is the most gentle formula that is available.

Click here for HappySmile 10% Carbamide Peroxide- (10) Pack

OR

Click here for SDI Polanight 10% Carbamide Peroxide- (10) Pack

Dental Gel 16% Options 2.

16% Ideal Starting Gel for normal teeth and for people who do not suffer sensitivity.

Click here for HappySmile 16% Carbamide Peroxide (10) Pack

OR

Click here for SDI Polanight 16% Carbamide Peroxide (10) Pack

Dental Gel 22% Options 3.

22% is ideal if you have used 16% and now want a faster gel.

Click here for HappySmile 22% Carbamide Peroxide (10) pack

OR

Click here for SDI Polanight 22% Carbamide Peroxide (10) Pack

Dental Gel 35% Options 4.

35% HappySmile (ADVANCED) ULTRA-HIGH strength is ideal if you have used the 22% but now want to UPGRADE for ULTRA FAST speedy results. No more waiting for results with this option!

Click here for HappySmile 35% (ADVANCED) ULTRA- HIGH Strength Gel- 10 Pack

OR

Click here for SDI Pola 35% (MAX Strength)- 10 Pack

______________________________________________

Select a Dental Tray System:

Dental Tray Option 1.

Custom Fit Dental Lab trays:

HappySmile Custom Fit Dental Trays Work Best for Optimum Results!

Click Here for our (ADVANCED) Custom Fit Lab Tray Services

Self Impression Instructions:

CONTENTS OF SELF IMPRESSION KIT

  • Impression putty – Blue (Putty Base) & White (Putty Catalyst)
  • Impression trays – upper (no 3) & lower (no 4)
  • Impression medical bag
  • Return address

ESSENTIAL REQUIREMENTS

  • Stopwatch to time the stages it is essential to follow the times in all steps.
  • Mirror – to help take a good impression
  • Please read all the steps before you start.
  • Please remove any dentures before impression taking.

PLEASE NOTE

  • During hot summer months please store your impression putty in the refrigerator before use.
  • The impression putty should be allowed to warm up to room temperature before use.
  • The impression putty is a commonly used high grade dental impression material. Material safety data information available on request.

UPPER IMPRESSION

STEP 1

Select upper tray. The upper tray is the full tray.

Practice putting the tray in your mouth before starting the process. If you find that the impression tray is too large or too small. Please contact us before using the impression putty and we can then send out replacement trays. Please contact us if you are unsure about the impression tray size.

Please wash your hands. Take 2 moulds of putty 1 x colour and 1 x white out of the tubs and place them in your hand.

STEP 2

Mix the putties together in your hand until they form a putty of one uniform colour.

Roll into a sausage and place into the impression tray.

Using your thumbs gently push the putty into the outer edge of the tray. You should not see the edge of the tray.

NB

You have 1 minute for this step, please use the whole time given.

STEP 3

Looking in a mirror, open your mouth as wide as you can and using both hands inset the impression tray in your mouth.

NB

Ensure teeth are aligned in the middle of the putty.

Step 3 and Step 4 to be completed within 25 seconds.

TIP – Ensure there is plenty of putty towards the front edges of the tray in order to capture both your teeth and gums – then bite as deep as you can.

STEP 4

Firmly pushing the tray upwards make sure you lift your top lip up and out of the way whilst pushing the tray straight up into your teeth. Do this until your teeth hit the bottom of the tray and hold in position with thumbs for 4 minutes, do not speak.

STEP 5

After 4 minutes, push your index fingers up into your cheeks until you feel the rim of the tray and GENTLY prize down until the tray comes free. Rinse with cold water and allow to dry naturally.

NB. Do not remove the putty from the impression tray.

✔ GOOD IMPRESSION

You can see all of your teeth clearly in the impression tray.

You can see a deep outline of your gum above your teeth.

✘ BAD IMPRESSION

Teeth look stretched or distorted.

Bite is shallow.

No gumline is visible.

STEP 6

Please follow steps 1 – 5 again this time for your lower impression.

Place your completed impressions in the enclosed medical bag with completed order form and return. Enclosed is a self adhesive return address you can stick this to the original postal envelope covering your address over, thank you. We will manufacture and send out your custom fit appliance within 7 working days.

Click Here for our (ADVANCED) Custom Fit Lab Tray Services

______________________________________________

Dental Tray Option 2.

HappySmile (Instant) Dental Trays:

Description

  • Blue 1.5mm Outer Tray/White 1.0 mm Inner Tray
  • Custom fits in warm water
  • Disposable outer tray
  • White material is more rigid than EVA materials
  • Can be trimmed with scissors or a dental burr to the gingival margin
  • Front tab for easy forming in warm water
  • BPA-free, PVC-free, Latex- free, no Phthalates

HappySmile trays are perfect for an instant dental bleaching tray that can be made at home. Please make a note of the web link on how to make them below. We supply the original HappySmile trays that are known for the highest quality. Please feel free to also click the link to the video demo below. You can also purchase a set of these whilst you are waiting to have your custom fit trays made by our dental lab. You will not find a better instant dental tray as these were developed to be used with dental peroxide.


How To Make HappySmile Instant Tray Instructions:

Step 1 Brush and floss your teeth.

Step 2 Boil the water in a kettle and pour 300 ml into a large bowl or cup. Then leave to cool for a full five minutes or until the water reaches 70 degrees centigrade, which is around 160 degrees farenheit. But do be careful as boiling water can scald and is very hot. Try not to get the water too hot !

Step 3 Secure the white thin tray inside the coloured tray and whilst still holding the handle, submerge the combined trays into the water try to make sure the whole mouthpiece is submerged up to the handle. Then shake the trays to remove any air bubbles that may be present.

Step 4 - Slowly wave the mouth trays in the water until the handle becomes soft and flexible. You will notice a slight loss of shape as they collapse.

Step 5 Remove the trays from the water after about a minute and test for flexibility. The material should be soft enough to mould against your teeth. Use a finger to check. If not, resubmerge the trays in the water until flexible enough.

Step 6 Holding by the handle, insert the trays into your mouth making sure that your teeth are midway between the walls of the white tray.

Using your fingers, form the tray by pressing firmly against your front teeth first and then up towards your gums. Remove your fingers and try to suck the water out of the tray, while it is still in your mouth. This will make it conform to your teeth better. As the dental tray cools it will tighten over your teeth. At this stage you should bite lightly on the tray and loosen it off once without completely removing it.

Step 7 - Once the dental mouth tray has cooled in your mouth, which takes about 3 minutes simply remove the dental trays. Separate the white tray from the coloured tray. The white contoured tray is the custom fitting dental tray that will be used for home teeth whitening.

Step 8 If the mouthpieces extend too far over your gums it can be uncomfortable. Simply cut off any excess material with sharp scissors. Smooth over any sharp edges by reheating in warm water and applying finger pressure. Remember that your mouthpieces needs only to cover your front eight or so teeth as these are usually the only ones that only need whitened. Snipping off the back of the section of the mouthpiece may make it more comforable to wear.

Step 9- Rinse mouthpieces with COLD water.

Step 10 - Repeat the process for your lower set of teeth.

End of the process.

Click here for HappySmile Instant Mouth Trays

Click here for our Custom Fit dental Lab Tray Service

HappySmile Help & Support:

Please remember you are never alone as HappySmile offer you FREE HELP and ADVICE. You simply send in a support ticket if you have any questions?

CLICK HERE TO SUBMIT A CUSTOMER SERVICE SUPPORT TICKET

***************************************************

HappySmile Tooth Whitening Tips:

Do not rush treatment. Do not overload the trays with the gel. Keep the dental gel stored in the fridge or cool place. Do not use any type of mouth wash during the course of treatment. If you get any gel onto the gums during treatment then simply remove it with a wet cotton bud. Sometimes you will find that during tooth whitening it can be patchy where part of the enamel is not as white as the other part and this is normal and will even out as you do a full course of treatment. Do remember that the professional dental bleaching effect does not last for ever so you will need to apply more applications every 3 months or when needed. We supply smaller packs for top up treatments. Lower strength gels take longer to whiten teeth than stronger strength gels. Higher strength gels "speed" up the procedure. Only ever use HappySmile Gels for 30 mins max as they are advanced dental whitening gels that do not need long weartimes.

Shopping Questions & Answers:

Q) What strength to use?

A) HappySmile 35% ULTRA-HIGH strength is in our no sensitivity formula so you can get power whitening results with less wear time- it is very fast and less gel is needed. Lower strengths are least popular as they take too long to whiten teeth and people want to have speedy results with the shortest weartime. Do you really want to spend hours wearing a dental tray?? Order HappySmile 35% are top selling and most popular dental product.

Q) How long does the bleaching effect last?

A) The bleaching effect will usually last 3 months then you simply do a touch up when needed.

Q) Do you GUARANTEE the HappySmile brand?

A) YES we guarantee the HappySmile brand.

Q) Can you use dental peroxide if you are pregnant or are nursing mother?

A) No it is best not to do this during these times.

Q) Is tooth bleaching safe?

A) Yes. When you use the brands we supply as they are tested.

Q) Can I only use dental peroxide to whiten teeth?

A) You can only use dental peroxide to whiten teeth and is a proven fact. Non-peroxide tooth whitening systems do not work. You can only deep clean enamel using "dental peroxide" as it is the "oxygen" that lifts out the deep dental stains. HappySmile systems are proven to work

Q) Can I use dental bleach on crowns, dental fillings, bridges etc

A) Yes, but remember dental bleach will only whiten natural teeth and will not bleach crowns or fillings. Dental peroxide will not damage crowns or fillings etc.

Q) How white will my teeth be after dental bleaching?

A) You can experience upto 12 shades+ lighter. It is a gradual process over 14 days. You can finish the course earlier if you have the level of teeth whitening that you desire. The stronger the bleach the faster the results!

HappySmile 35% (ULTRA-HIGH) Strength is very fast acting if you need to see results very quickly then this works FAST!

Q) How do I store HappySmile dental peroxide?

A) Dental peroxide is heat-sensitive so you need to keep it in a cool place such as the fridge but please do keep it away from small children.

Q) How long does the dental bleach last?

A) The dental peroxide we supply has a shelf life of upto 2 years.

Q) What happens if I swallow any dental peroxide?

A) If you swallow any dental peroxide it will not affect you.

Q) Does dental bleaching have any side-effects?

A) The only side effect is temporary sensitivity and the HappySmile brands are the most gentle products that are available.

Q) How can I prevent sensitivity?

A) Purchase the HappySmile brand!

Q) I have some uneven whitening where some parts of the enamel is not bleaching?

A) Do not worry as this is normal and will even out as you do a full course.

Q) How does dental bleaching work?

A) Dental peroxide causes "oxygen" to deep clean the enamel.

Q) How long will it take for my teeth to get white?

A) Usually it is for 30 mins (regular strength) for upto 14 days. If you use our HappySmile 35% ULTRA-HIGH strength then it is just 10 mins per application for upto 10 days.

Q) What should I do if I get any gel onto the gums during the whitening treatment?

A) Simply use a damp cotton bud to remove any gel.

Q) Does dental peroxide damage the gums?

A) No.

Q) What are the benefits of whitening my teeth using HappySmile?

A) HappySmile dental peroxide not only whitens teeth but the peroxide kills dental bacteria and it is the bacteria that causes tooth decay.

Q) What is more popular Polanight or HappySmile?

A) 4 out of 5 customers choose the HappySmile brand. The HappySmile 35% (advanced) product is our top dental seller.

***********************************************************

Dental Shopping Questions:

Q) How long does it take for my order to arrive?

A) We send out next day by first class Royal Mail delivery. Delivery is very quick and we send all items by recorded mail unless you tell us when ordering to send by unregistered post. You will see a comment box on our checkout where you can add a note. Simply select the dental products and add it to your shopping cart.

Q) How is my order sent?

A) We send your dental order by recorded Royal Mail and we include FREE delivery.

Q) What is your privacy policy?

A) We post your dental order under plain cover and no branding or markers are on the envelope. We offer a very discreet service as we respect your privacy.

Q) Do you deliver HappySmile (UK) dental products to my country?

A) YES! We ship to any country in the world and include FREE delivery.

***********************************************************

(Please contact our customer services department if you need any more help and advice on HappySmile dental products.)

Thank you for purchasing HappySmile Dental Products.


  • My Account
  • Track Orders
  • Favorites
  • Shopping Bag
Display prices in:GBP
Share Share Pin
© The HappySmileUK Superstore. Report abuse Cookie settings
Powered by